@[toc] # 创建示例项目 新建ASP.NET MVC项目,名称设为PartyInvities # 使用ViewBag将数据从控制器传给视图 ViewBag视图包是Controller基类的成员,他是一种动态对象,可以赋任意属性使这些属性的值再渲染的视图中可用。比如在首页显示控制器获取的当前时间:
using PartyInvities.Models;
using System;
using System.Collections.Generic;
using System.Linq;
using System.Web;
using System.Web.Mvc;

namespace PartyInvities.Controllers
{
    public class HomeController : Controller
    {
        // GET: Home
        public ViewResult Index()
        {
           DateTime time = DateTime.Now;
           ViewBag.Greeting = time.ToString();
            return View();
        }
        }
    }
}
Index.cshtml更改为:
@{
    Layout = null;
}

<!DOCTYPE html>

<html>
<head>
    <meta name="viewport" content="width=device-width" />
    <title>Index</title>
</head>
<body>
    <div>
       The time is @ViewBag.Greeting <br/>
        Hello World!(from the view)
    </div>
</body>
</html>
[这里写图片描述]/uploads/2-1.jpeg)
Html辅助器方法
辅助器方法可以方便的渲染HTML的链接、文本输入框、复选框、选择框和其他内容。例如链接辅助器方法Html.ActionLink有两个参数,第一个是显示的文本,第二个是单击时执行的操作。因此在首页中添加一个链接可以更改为: Index.cshtml更改为:
@{
    Layout = null;
}

<!DOCTYPE html>

<html>
<head>
    <meta name="viewport" content="width=device-width" />
    <title>Index</title>
</head>
<body>
    <div>
       The time is @ViewBag.Greeting <br/>
      We are going to gave an exciting party.<br>
      @Html.ActionLink("RSVP Now","RsvpForm")
    </div>
</body>
</html>
由于链接指向RsvpFrom动作,因此需要在Home控制器中添加该动作方法RsvpForm: HomeController.cs更改为:
using PartyInvities.Models;
using System;
using System.Collections.Generic;
using System.Linq;
using System.Web;
using System.Web.Mvc;

namespace PartyInvities.Controllers
{
    public class HomeController : Controller
    {
        // GET: Home
        public ViewResult Index()
        {
           DateTime time = DateTime.Now;
           ViewBag.Greeting = time.ToString();
            return View();
        }
       public ViewResult RsvpForm()
        {
            return View();
        }

        }
    }
}
强类型视图
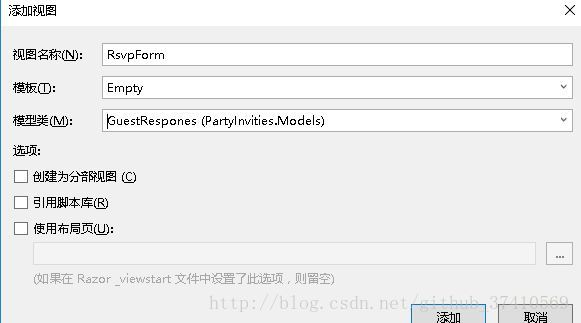
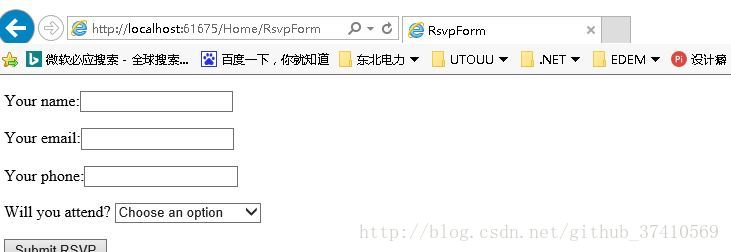
在此需要再添加RsvpForm方法的默认视图,在这里添加一个回复表单,内填写的内容为上一章添加的数据模型GusetResponses的内容。在这里采用强类型视图: 在Home控制器RsvpForm方法右键添加视图,选择模板为Empty,模型类选择之前建好的模型类GuestRespones.cs  添加强类型视图后会在Views/Home中找到RsvpFrom.cshtml,打开并修改为如下:
@model PartyInvities.Models.GuestRespones

@{
    Layout = null;
}

<!DOCTYPE html>

<html>
<head>
    <meta name="viewport" content="width=device-width" />
    <title>RsvpForm</title>
</head>
<body>
    @using (Html.BeginForm())
    {
        <p>Your name:@Html.TextBoxFor(x=>x.Name)</p>
        <p>Your email:@Html.TextBoxFor(x => x.Email)</p>
        <p>Your phone:@Html.TextBoxFor(x => x.Phone)</p>
        <p>
            Will you attend?
            @Html.DropDownListFor(x=>x.WillAttend,new[]{
            new SelectListItem(){Text="Yes,I will be there",Value=bool.TrueString},
            new SelectListItem(){Text="No,I will not be there",Value=bool.FalseString}
            },"Choose an option")
        </p>
        <input type="submit" value="Submit RSVP"/>

    }
    <div>

    </div>
</body>
</html>,在这个页面中每一个GuestRespones的 属性都采用辅助器方法生成适当的input标记,使用Lambda表达式选择与input元素相关的属性。如
…
@Html.TexBoxFor(x=>x.Phone)
…
它表示生成一个input元素的HTML,将元素的type参数设置为"text",id和name标签属性为“Phone”,Phone是所选域类的属性名。 
设置启动url
在Visual Studio的PROJECT(项目)->PartyInvites Properties(PartyInvites Properties 属性)中,web选项卡选中Start Action(启动操作)分类中“Special Page”(特定页面)选项,不必给他输入一个值因为他会自动选择默认页面Home。此时启动程序即可。 # 处理表单 运行并跳转到表单填写页面之后,点击按钮后填写的内容会消失,这是因为submit并未告知mvc要做什么,因此默认回递给RsvpForm方法使得页面重新渲染。因此添加一个方法接收post请求并处理,但有一种简单聪明的方法是添加另一个RsvpForm处理post请求,在C# 中使用GET或POST标记可以指定某一方法的触发时机,页面初次加载时由GET方式获取,而提交Html.FormBegin生成的form时由POST方式获取,因此对控制器做如下更改: using PartyInvities.Models; using System; using System.Collections.Generic; using System.Linq; using System.Web; using System.Web.Mvc;
namespace PartyInvities.Controllers
{
    public class HomeController : Controller
    {
        // GET: Home
        public ViewResult Index()
        {
           DateTime time = DateTime.Now;
           ViewBag.Greeting = time.ToString();
            return View();
        }

 [HttpGet]
        public ViewResult RsvpForm()
        {
            return View();
        }

        [HttpPost]
        public ViewResult RsvpForm(GuestRespones guestrespone)
        {
             View("Thanks", guestrespone);
        }
    }
}
模型绑定
[HttpPost]标记的RsvpForm方法的参数是页面表单提交的模型数据,它可以解析出输入输入数据并将HTTP请求中的“键/值”用来填充域模型类型。模型绑定的作用与html辅助器方法的相反, Html辅助器方法是将模型数据类型转化为html信息,而模型绑定则将html信息转化为模型数据 渲染其他视图 … return View("Thanks", guestrespone); … 这个View方法告诉mvc查找并渲染一个"Thanks"的域模型类型为guestrespone的强类型视图,右键单击HomeController任意一个方法选择添加视图,名称为Thanks的强类型视图,模型类型为GuestRespones,创建过程与之前RscpForm视图一致。生成Thanks视图后对其进行编辑:
@model PartyInvities.Models.GuestRespones

@{
    Layout = null;
}

<!DOCTYPE html>

<html>
<head>
    <meta name="viewport" content="width=device-width" />
    <title>Thanks</title>
</head>
<body>
    <div>
        <h1>Thank you,@Model.Name!</h1>
        @if (Model.WillAttend == true)
        {
            @:It's great you are coming! !The drinks are already in the fridge!

        }
        else
        {
            @:Sorry to hear you can not make it,but thanks for lettingus know.
        }

    </div>
</body>
</html>
Razor的@Model表达式指示了这个强类型视图的域模型类型。 # 添加验证 对模型类的每一个属性进行验证,保证其不为空或满足特定样式,修改其定义如下:
    using System;
    using System.Collections.Generic;
    using System.Linq;
    using System.Web;
    using System.ComponentModel.DataAnnotations;

    namespace PartyInvities.Models
    {
        public class GuestRespones
        {
            [Required(ErrorMessage="Please enter your name")]
            public string Name { get; set; }

            [Required(ErrorMessage="Please enter your email address")]
            [RegularExpression(".+\\@.+\\..+",ErrorMessage="Please enter a valid email address")]
            public string Email { get; set; }

            [Required(ErrorMessage = "Please enter your phone number")]
            public string Phone { get; set; }

            [Required(ErrorMessage = "Please specify whether you will attend")]
            public bool? WillAttend { get; set; }
        }
    }
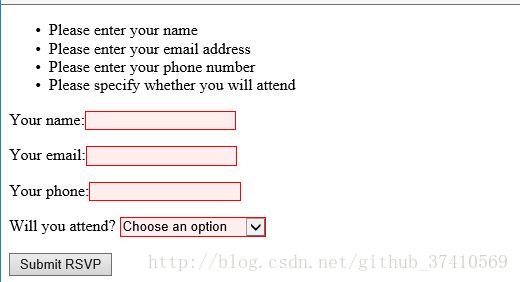
MVC在进行模型绑定时会自动侦测这些验证并引用,可以在控制器处理post请求时可以使用ModelState.IsValid属性来检查是否有验证问题,如果没有验证问题显示Thanks页面,否则重画表单并重新填写。注意模型绑定会保留表单的内容,尽管重新进行了渲染。
…
        [HttpPost]
        public ViewResult RsvpForm(GuestRespones guestrespone)
        {
            if (ModelState.IsValid)
                return View("Thanks", guestrespone);
            else return View();
        }
 …
Html.ValidationSummary方法为视图提供验证提示
@Html.ValidationSummary()辅助器方法会在表单中以占位符的方式创建隐藏的列表项,当出现验证问题时会显示绑定的模型中特定的错误提示。
…
<body>
    @using (Html.BeginForm())
    {
        @Html.ValidationSummary()
        <p>Your name:@Html.TextBoxFor(x=>x.Name)</p>
        <p>Your email:@Html.TextBoxFor(x => x.Email)</p>
        <p>Your phone:@Html.TextBoxFor(x => x.Phone)</p>
        <p>
            Will you attend?
            @Html.DropDownListFor(x=>x.WillAttend,new[]{
            new SelectListItem(){Text="Yes,I will be there",Value=bool.TrueString},
            new SelectListItem(){Text="No,I will not be there",Value=bool.FalseString}
            },"Choose an option")
        </p>
        <input type="submit" value="Submit RSVP"/>

    }
    <div>

    </div>
</body>
…
高亮显示无效字段
看一下有无验证错误时html辅助器生成的input元素有何不同: 没有验证问题时(初次加载):
< input data-val="true" data-val-required="Please enter your name" id="Name" name="Name" type="text" value="" />有验证问题时:
< input class="input-validation-error" data-val="true" data-val-required="Please enter your name" id="Name" name="Name" type="text" value="" />可以看出有验证错误时为input标签添加了一个class标签属性,因此创建一个css样式表并引用到本页面即可使出现验证错误时显示特定样式。 MVC项目约定静态内容如CSS样式表等放在Content文件夹中,在资源管理器中右键项目并选择新建文件夹命名为Content,右键Content文件夹添加NewItem(新项),选择Style sheet,命名为Style.cs,并对其进行编辑:
.field-validation-erro{color:# f00;}
.field-validation-valid{display:none}
.input-validation-erro{border:1px solid # f00;background-color:# fee;}
.input-validation-valid{display:none}
在RsvpForm中引用本css样式表:可以手动输入,也可以从解决方案资源管理器中直接将css样式表拖动进视图中
…
<head>
    <meta name="viewport" content="width=device-width" />
    <link href="~/Content/Style.css" rel="stylesheet" />
    <title>RsvpForm</title>
</head>
# 发送电子邮件 可以添加一个动作方法使用.NET框架的E-mail类创建和发送一份邮件,但书中采用了WebMail辅助器方法,它不属于MVC框架部分,但是可以避免另外再建立一个发邮件的表单。在渲染Thanks页面时发送邮件信息,对Thanks.cshtml修改:
<body>
    @try
    {
        WebMail.SmtpServer = "服务器名";
        WebMail.SmtpPort = 587;
        WebMail.EnableSsl = true;
        WebMail.UserName = "";
        WebMail.Password = "";
        WebMail.From = "zhanghao";
        WebMail.Send("youxiang","RSVP Notification",Model.Name+"is"+((Model.WillAttend ??false)?"":"not")+"attending");

    }
    catch (Exception)
    {
        @:<b>Sorry-we don not send the email to cnfirm youe RSVP.</b>
    }
    <div>
        <h1>Thank you,@Model.Name!</h1>
        @if (Model.WillAttend == true)
        {
            @:It's great you are coming! !The drinks are already in the fridge!

        }
        else
        {
            @:Sorry to hear you can not make it,but thanks for lettingus know.
        }

    </div>
本篇到此结束,第一个MVC程序功能基本实现,但样式真的惨不忍睹。下一篇将介绍如何使用NuGet安装bootstrap以添加诸多美化样式。